I had already pinned a bunch of DIY T-shirt scarf tutorials, so I didn't have much research to do; but because I only had a tiny bit of fabric left (the sleeves and bottom 2 or 3 inches from my Ts), I only had a couple options. I picked Rabbit Food For My Bunny Teeth as my teacher. I followed her instructions pretty closely with a few tweaks here and there. To do this yourself, all you'll need is an old T-shirt (the larger the better) and some scissors.
To make the scarf, I could really only use the few inches I salvaged from the bottom of the shirts. I had bunches of colors, so I had to pick and choose from what coordinated. If you try it, I'd use an entire shirt from the bottom hem to the armpits. The loops need to be long enough to drape around your neck a few times, so anything above that doesn't work. I cut pieces measuring about an inch (give or take a bit) along the width of the shirt. (Sorry for the lack of pictures. I was busy trying to figure out what I was trying to do.) Your pieces should remain as loops. Do not cut them open! Cut pieces until you no longer have any fabric left. If you go from the bottom of the hem to the armpits, I think you'll end up with about 15 loops. If you'd like a bulkier scarf, repeat these steps with a second T! Save the bottom hem for later.
Once all your loops have been cut, put your thumbs inside and pull outward, stretching the loop as far as it goes, until the fabric begins to curl inward. Repeat this step for each loop.
Here's where you'll need the bottom hem line. Cut the bottom hem line so it becomes one long piece.
Gather all of your loops.
Then, using the last 4 to 6 inches of the hem you cut, tie a knot in any random place around all of the loops. You'll want to leave a bit fabric hanging for later. With the remaining hem, wrap the loops in an overlapping fashion up and then down again for about 3 or 4 inches. When you come back down, tie the end of the hem piece with the piece you left hanging from earlier. You can either trim those pieces short or leave them hanging a bit to add some interest. I left mine hanging a bit.
Depending on the look you're going for, wrap the finished product around your neck once or twice. I like the twice-wrapped look!
I would have liked it to be a bit chunkier. In the future, if I do this again, I'll definitely use more loops. I was working with what I had!
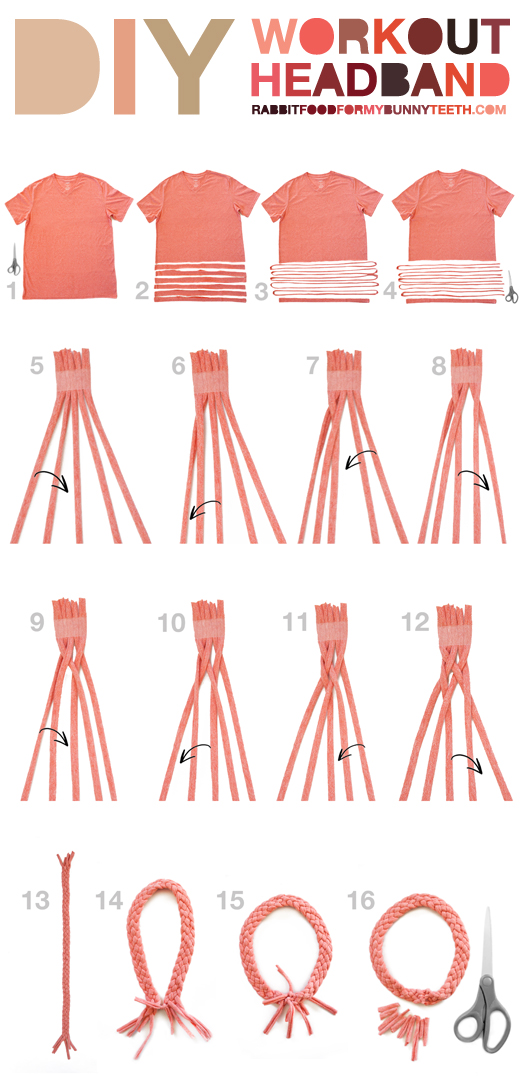
After I was done with the scarf, I made a headband. Rabbit Food For My Bunny Teeth also has a DIY Workout Headband tutorial. I followed that one pretty closely too. I prepared 5 loops exactly the same way as I did for my scarf (by cutting and stretching). For this one, I cut them to make 5 long strings (instead of loops). Then, I taped the 5 strands together and used a binder clip to secure it to the piping on my couch so I could weave without worry. Remember the days of making friendship bracelets with embroidery floss? It's kind of like that!
The weaving pattern is very simple once you figure it out, but it's a bit tricky at first. Make sure your strings are completely separated so you can clearly see the order. First, you bring the far left string over the second farthest left string. Then, you bring the middle string over the second farthest left string (which was originally the farthest left string). Then, you bring the farthest right string over the second farthest right string. Next, you bring the middle string over the second farthest right string (which was originally the farthest right string). This pattern continues until you're finished weaving. Finally, measure the headband around your head and double knot the strings at the top to the strings on the bottom. Each of the strings (top and bottom) should be double knotted to a different string on the opposite end. That way, it's pretty secure. When measuring, keep in mind that the fabric you're working with is cotton and will stretch considerably. I went with a snug fit knowing that it will stretch over time.
Rabbit Food For My Bunny Teeth offers a fabulous pictorial. Check it out since I'm not doing a very good job:
 |
| Rabbit Food For My Bunny Teeth |
When it's all done, it should look something like this:
Pretty cute, huh? I was pleased to complete 3 fun, simple, and free projects using 15 old T-shirts! What do you think?
P.S. If you enjoy reading my blog, please follow me by clicking "Join this
site" and/or entering your email address over to the right of the page. If you
want to see what projects I have worked on or plan on working on in the future,
follow me on Pinterest by clicking the link to the right! If you like it, pin it!
 |
| I'm linked up with Hi Sugarplum! |


Those are both so cool! How do people think of this stuff?
ReplyDeleteThanks! I know...People are so creative. I'm glad I have their shoulders to stand on! :)
ReplyDelete