Showing posts with label DIY. Show all posts

Tuesday, August 12, 2014

Queen of the Castle - DIY Upholstered Bench

Our little Carly is quite the princess. She's slowly inching her way up to queen status, and I didn't help matters when I gave her a thrown on which to sit.

Our front window has always been a design dilemma for me. For one thing, it's huge. Ginormous, really. Also, it is fashioned with...wait for it...vertical blinds. Ugh. What is this, a doctor's office? But what's a good solution? While there are many options, I have yet to figure out the perfect one.

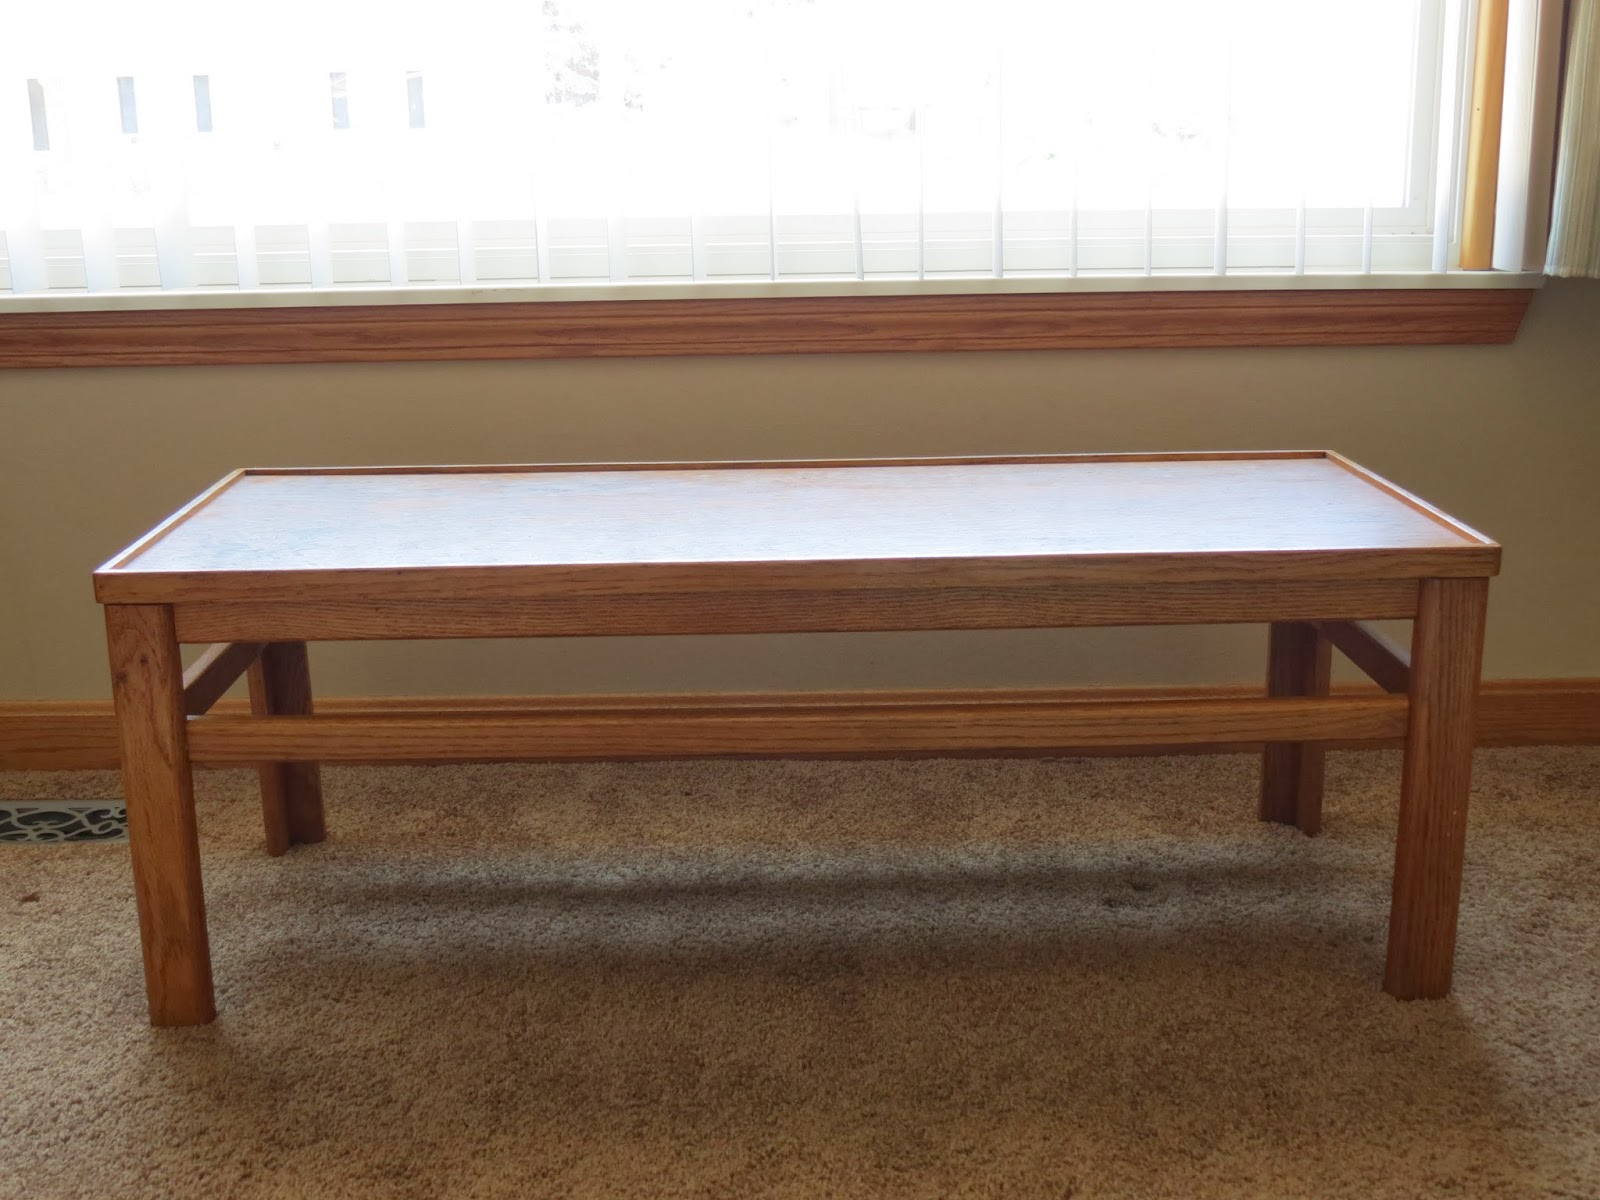
Before getting Carly, I toyed with the idea of putting a few arm chairs and maybe a table in front of the window. I also really liked the idea of a long bench that offered extra seating. Once we adopted Carly and made the decision that we wouldn't let her on the couch, I thought she should have something comfy to lay on too. As a bonus, she would get to look out the window and go crazy staring at all the rabbits lurking on the other side. Pesky wabbits.

I made a trip to one of the local Salvation Army stores and quickly found exactly what I needed: a small and basic wooden coffee table. I think I paid a little more than $20 for it.


She's really excited about her new bench. Can't you tell? 
I also scored a piece of upholstery fabric for under 3 bucks at the same Salvation Army. Yahoo! What you see is the back of the fabric. I did wash it, but as you can see, I did not iron it. It's just not my thing, okay?


After securing the find of the century a run-of-the-mill coffee table from the 90s, I ran to Joann Fabrics with a 50% off coupon in hand. Here's where it gets ugly. A 4-inch piece of foam that I had cut to the length of my coffee table was 60 dollars. Six. Zero. Whoa, Nelly. I knew it would be expensive, but dang, girl! Figuring I was in pretty deep at this point, I went for it. I also grabbed a large sheet of light-weight batting.

After getting my loot home, I enlisted the help of my favorite husband, Rich, to help me pry the table top off the base. There were several screws involved which were pretty easy, but the thing was also glued down. Once we got it off, I used a marker to trace along the outside edge of the table. Then, I used a serrated bread knife to cut that baby down to size.


Next, I laid the still-not-ironed fabric flat on the floor face down followed by the batting followed by the rectangular cut of foam followed by the table top face down. Before laying the foam or table top on my fabric, I made sure to keep them in line with the pattern on the fabric. It's hard to see in this picture, but I could see the pattern through the back, so it was pretty easy in this case. 


After folding the batting and the fabric over the sides for a rough-measure, I cut the batting so I had enough to wrap and staple. Then, I cut the fabric about an inch and a half wider. Because the pattern on my fabric was pretty linear, it was easy for me to cut a straight line.


I wrapped the batting around and used a staple gun to secure it in several spots. As you can see, I wrapped it kind of like I would a gift. I tried a few different ways, but I thought this looked the best. 


Using the same gift-wrapping method, I wrapped the fabric around and folded the longer edge inside of the batting to give it a more finished look. Again, I stapled in several spots to make sure it was secure. In order to smooth out the many wrinkles, I just made sure to stretch it a bunch before each staple, always making sure to keep it lined up nicely.


Before reattaching the table top, I sanded and stained the legs with Poly Shades Mission Oak, the same color I used on the library file cabinet I worked on a while back. I used the same method this time -- sanded, stained, rubbed with steel wool, stained, let dry for 24 hours.

Finally, using the original holes and screws, my darling husband secured the new bench top into place.

This picture was taken the day we finished it, so you can see the wrinkles really weren't a problem in the end. I really do need to get in the habit of ironing, though. This project sure didn't teach me any lessons.

As you can see, Queen Carly really enjoys her spot on the thrown. Check out the dog-nose-window behind her. She's regal and she's artistic. We got really lucky with this one.


And because I can't resist, this:


All in all, I spent about $75. Considering similar items often cost $150 or more (I've seen them at as much as $699), I'm happy with the outcome. Plus, I can't really put a price on that cute little sleepy face.
Saturday, February 1, 2014

About a Boy

I'm so excited to share this little update!

My cousin, Tara, is having a baby boy in 5 short weeks. This time has just flown by. I can't get over the fact that it really feels like a month (maybe 2) ago that she was telling me she's pregnant. Almost immediately, I decided that I wanted to help her decorate the nursery by buying her little one a dresser. I had big plans to buy an unfinished one from Ikea, and paint it to coordinate with the colors she chose. After much deliberation, I ended up purchasing the HEMNES dresser in gray-brown. I figured I had more choices this way because the gray-brown color as-is could be a nice natural-looking element that might still coordinate with the light gray crib across the room; but I could also still paint the whole dang thing.

While mulling it over in my head, acting on a tip from my aunt, I visited a local boutique called Gracious Seasons and discovered they carry CeCe Caldwell's chalk paint. I picked up several samples, a tub of wax, and a couple brushes to play around with. I did play around and it is some pretty cool stuff! I'll definitely be working with it...on a future project.

I considered color-matching the crib, but worried that it would be too matchy-matchy or not match enough. After she shared her wall color choices with me, I considered using one of them to paint a simple stripe or two across the top of the dresser. I considered hand-painting an argyle pattern across the middle drawers. In fact, I found inspiration from all over the Interwebs:

this sweet little chevron number,
something striped like this,
and these cool little squares that wouldn't change the look of the dresser too much.

In the end, I just wasn't convinced I wanted to do any of them. I felt very paralyzed when I considered that this boy might use this dresser for the next 5? 10? 15? 20? 25? 30? years. I just didn't feel right about altering its look too much. After consulting the mother-to-be, I felt confident that the dresser was a good color. After thinking about it some more, I decided on a less-permanent option: exchanging the hardware.

Below is what I started with. The hardware that came with the dresser wasn't too shabby. The knobs are made of metal and had a nice weight. If left as-is, they would have worked just fine, but I just had to add a personal touch.


Forgive the super-close and pretty dark photos -- the dresser is currently sitting in the middle of the craft room and there's not a lot of wiggle room, the lighting is bad, and I have no interest in opening the shade for natural light because I'm a vampire.


And here's where it ended up:


Aren't the new knobs sweet? I picked all 12 up at Hobby Lobby where they were on sale for 50% off. I spent about $23. It really lightens the whole thing up and gives it a more baby-ish vibe. I went in searching for 12 of the same, but I'm glad it worked out this way. For one thing, they didn't have 12 of any one kind. For another, I think the varying styles give it a very whimsical vibe. Because the drawers get slightly bigger from top to bottom, I decided on a small, round, and white knob for the top 4 drawers, a slightly larger green one for the middle 4 drawers, and a larger-still black and white chevron dude for the bottom 4 drawers.


I plan on giving her the original hardware so she can neutralize it if she ever wants to, but for now, I think it's pretty cute!


I also picked up this cute little tray on clearance for $5.20. The clearance at at the Lobby of Hobbies is pretty beefy right now. I imagine they're trying to clear out last year's stuff.


Tara thinks she wants to use the dresser as a changing area, so I picture the tray holding things like powder and Butt Paste. I love that Butt Paste is an actual thing.


Also, Carly helped. 


I'm so stinkin' excited to meet that little boy. I sure hope this dresser serves him well for a long, long time.

Wednesday, May 29, 2013

Guest Bedroom: A Start on Accessories


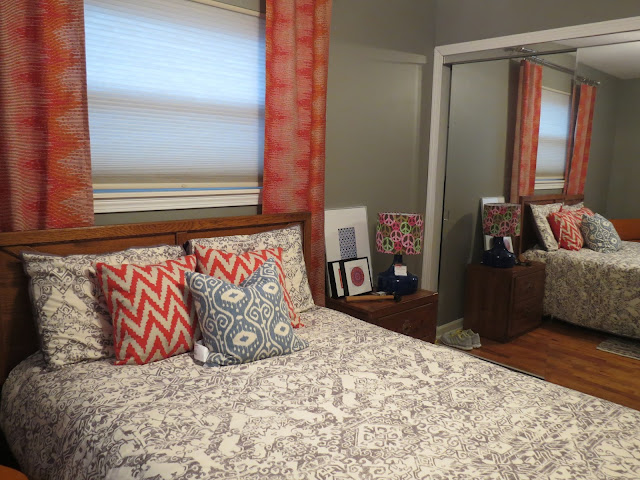
Lately I've been obsessed with the clearance section(s) at Target. On a recent trip, I spotted a cobalt blue lamp base I'd been eyeing for a while. It was only about $13, down from about $30. I wished they still had some of the shades that coordinated perfectly, but they didn't. It just gives me an opportunity for another DIY project. Check out that sweet lamp shade I snagged at a local Salvation Army for 4 bucks. 4 dollars for pink and green peace signs? Yep.


Notice the weird progression of colors in planning this room's potential: Coral? Red? Orange? Blue? Just go with it. It looks good, I swear.

How 'bout that rug? Isn't she lovely? Isn't she won-der-ful? I wasn't sure about it when perusing at Target, but Rich (a.k.a. Decorating Diva) talked me into it. After bringing it home, I was sure I liked it. It offers so much texture*.


These pillows were one of my first purchases when the color scheme began to come together. Actually, I originally purchased a few others when I wasn't sure, then not-so-promptly exchanged them. As with so many things, its difficult to see in the picture the texture the chevron ones bring to the room, but they're fab.


The baskets were a recent purchase from TJ Maxx. Where else can you get such awesome baskets at such a good price? I actually spotted theses several weeks ago before major decisions were made. I'm glad they were still around on my last visit. They're reminiscent of the dipped trend. Except that one (from West Elm) is $70! I got the baby girl for $15 and her big brother for $17. Can't beat it.


On to that weird chair in the corner of the room. It's orange. It's kind of ugly. Fugly, if you will. Where did it come from, you ask? Oh, I bought it. Remember those sweet green chairs over in the office? This one came from the same estate sale. I got the three chairs and the side table I refinished for $150.


Anyone have an opinion one way or another on the chair? I like the idea of it, but I don't like the shape of it. I don't like how deep it is. I definitely don't like the large poofy headrest. By the looks of it, there's more I don't like about it than do; but there's something about it that I want to like. When I originally brought it home, I had big plans for my first reupholstery project. Fast-forward about a year, and I'm scared. Plus, it's orange. Was it a happy coincidence that I grabbed an orange chair a year ago and now have the opportunity to incorporate the color into my room redo? Or is it just too fugly to consider?

I'm so happy things evolved the way they did. I'm loving the way it's turning out. I'm excited to recover the psychedelic lamp shade.  Plus, I recently worked on some sweet (and nearly free) art work that I'll be featuring soon.

I guess everything I've been reading about "the middle" is true. Sometimes things don't make sense right away, but if you keep moving, it might work out better than you ever planned.

*We got a dog. Her name is Carly, and she's the bomb diggity. To know me is to know I'm NOT an animal person. But Rich prodded until I gave in, and I just love her. What does this have to do with the texture of our new rug? Well, Carly likes it too. She likes it so much, in fact, that 15 minutes after laying that sucker in the ground, she started chewing on it. I almost lost my mind when I found her. Luckily, I discovered her before any permanent damage was done. Since its woven/braided, I was able to pull the strands back through. It looks as good as new! Oh yeah, it should. It is new. Damn dog. :)

Good ol' Carly. Isn't she cute?

P.S. If you enjoy reading my blog, please follow me by clicking "Join this site" and/or entering your email address over to the right of the page. If you want to see what projects I have worked on or plan on working on in the future, follow me on Pinterest by clicking the link to the right!

Tuesday, May 28, 2013

Guest Bedroom: Curtains and Bedding

We're in the middle stages of decorating our guest bedroom. I painted the walls Greystone and the trim Moutain Peak White (both by Benjamin Moore) and upcycled a dated ceiling fan. After that, I stewed for a while about what I wanted to do.

Way back in October, I began making a duvet cover . I bought fabric (a lot of fabric for a lot of money) in yellows and grays to start a quilt and quickly got frustrated with the too-difficult-for-an-almost-novice pattern. Instead, I sewed the hundreds of pieces I had already cut back together to make a strip quilt. When I finally finished it about 2 months later and slipped it on the duvet, I lied to myself for a couple hours before admitting that I hated it. I didn't think much of it. Since I still liked all the individual fabrics, I figured I could just use them on a different project down the road. I also realized that I'd rather stay away from the trendiness of grey and yellow. I ran to Target to see if they were carrying any inexpensive duvet covers that might work. As luck would have it, I ran into this beauty on clearance for about $30!


After purchasing the duvet, everything fell into place. Finally coming to the conclusion that I wanted to use coral tones as the main accent color, I ordered this fabric for the curtain panels I was planning.

While shopping, I noticed some of it was a tad redder than I had originally wanted to go with; but because I had been shopping frustrated for quite a while, I decided take the leap. When it came, It still felt a bit too red. What I didn't originally notice was the orange. Alas, I was stuck with it. That's definitely a risk you take when shopping for fabric online. As the days grew longer, so did my affection for the fabric. I love the gradient effect and I really do love the colors. For some reason, it reminds me of the friendship bracelets I used to make out of embroidery floss. Remember, Mom? Using the same method as last time, I whipped up some curtain panels. Check 'em out.


When making the purchase, I worried the fabric would be too narrow. I planned on cutting the fabric in half to make 4 panels. At 44 inches, it was a skinny mini, but I couldn't bring myself to buy double the yardage. Having to hem almost an inch on both sides, each panel ended up being just over 20 inches. After hanging them, I'm okay with the narrowness. After all, they're just there for looks. We're rocking purpose-serving cellular shades behind 'em.

I hung them using a method I found on Pinterest. Basically, I took a scrap piece of 12 x 12 card stock from my collection. From the bottom right hand corner, I cut a 3 x 3 square. From the top left corner of the small square, I measured 8 inches up (the distance I wanted the curtain rod to hang from the top of the window). From that point, I measured 9 inches to the left (the distance I wanted the curtains to hang from the left side of the window). I pierced a hole through the cardboard, held the 3 inch cut square up to the top left corner of the window, and marked a dot. For the right side of the window, I just flipped the cardstock around and repeated the process. The dots are your drill marks! It's fool-proof!

If you look closely, you can see the marks I made at 8" up and 8 and 9" over.
We bought the curtain rods at (yep, you guessed it) Target. I looked at quite a few places. I really wanted the same ones I bought for the office because they have the same mercury glass detail I replicated on the ceiling fan, but Lowes no longer carries them. I settled for these ones, still featuring the mercury glass detailing I was looking for, just in a different shape. I like them just as well.


So far so good, don't ya think?

P.S. If you enjoy reading my blog, please follow me by clicking "Join this site" and/or entering your email address over to the right of the page. If you want to see what projects I have worked on or plan on working on in the future, follow me on Pinterest by clicking the link to the right! If you like it, pin it!

Friday, April 5, 2013

Serious Upcycle: Ceiling Fan Update & DIY Mercury Glass

Bada bing, bada boom. That cliched expression pretty much sums up how I feel about what I accomplished with $14.04 and 2 hours of my life. Here we go.

The dreaded ceiling fan. So practical. So windy. So aesthetically displeasing. Especially this one, circa 1992 (or so). I didn't really want to remove the fan altogether and replace it with something else. For one thing, it would most likely have been pricey. For another, I might not have liked it too much in the end. So, for the last few days, I've been pondering ways to transform this monster into something prettier. Should I paint it? I thought about painting stripes or cheverons on the blades. Nope. Too crazy/trendy. I thought about spraying the hardware silver and the blades white. Maybe. Then it hit me: mercury glass!

I've pinned a ton of DIY mercury glass tutorials (my favorite being this one), and I've been meaning to try my hand at the magic. This was the perfect opportunity. Having read on several tutorials that the only place to find Krylon Looking Glass spray paint is Hobby Lobby, I headed straight there. On the way, I continued to ponder about how I would deal with the gold hardware and the blades. While in the spray paint aisle, I decided I'd use Krylon's Brushed Nickel for the hardware and leave the blades as-is for now. I wanted to think about it a bit longer before doing any irreversible damage. I'm known for making rash, impatient decisions. Just ask my mom my husband my sister my cousins my co-workers anyone I've ever met.

There she blows before I began spraying but after I prepped the ceiling. Yikes. I think Rich might have murdered me if he knew I was spray painting inside the house in a room that I just spent three days painting. Spoiler alert: I'm not dead. What Rich doesn't know (until he comes home or reads this) won't kill me. No worries. Carrie @ Dittle Dattle showed me it was okay to use the following method. Yes, if Carrie @ Dittle Dattle told me to jump off a bridge, I would.


Before painting the hardware, I had to remove the blades. Here's where it gets good. After taking the first blade off, I discovered that they were reversible! Super! Who chose to use the lighter side? The dark side is so much better. Check it out!


Once the blades were all down, I donned this mask. Safety first, people. I am Luke's father. That's the second Star Wars reference in 5 sentences, and I've never seen even one of those movies.


After a couple coats of brushed nickel, the motor and hardware came out looking more like this:


Below are the original glass shades. What is the technical term for those things?  As you can see, they are bumpy. Anyone who knows me knows I detest bumps. Let's not talk about it.


To achieve the desired effect, I sprayed the inside of the shades with a couple thin coats of the looking glass spray. Some of the tutorials I read suggested several coats (up to 5 or 6), but I went with 2 because since it's a light fixture, I wanted to maintain the opacity.


After applying 2 thin coats, I sprayed the painted surface with a 50/50 mixture of white vinegar and water. I let that sit for about a minute then  dabbed with a paper towel moistened with the same vinegar/water mixture.


While wiping, my fingerprints created this masterpiece. He looks happy
about the result, no?
Here's a shot of what it should look like after you've dabbed and wiped. As always, the photo doesn't do it justice. You'll have to try it out and see for yourself!


I could hardly wait to see the final results after replacing the blades on the reverse side. I ripped the newspaper off the ceiling, jumped off the ladder, and scoped out my upcycled ceiling fan. Behold:


It's so much easier this way:

Before


After
So what do you think? Are you as thrilled about this upgrade as I am? At the very least, I dusted the fan blades. At the very best, I got a new fan for $14.04.

P.S. If you enjoy reading my blog, please follow me by clicking "Join this site" and/or entering your email address over to the right of the page. If you want to see what projects I have worked on or plan on working on in the future, follow me on Pinterest by clicking the link to the right! If you like it, pin it!

I'm linked up with:
The Shabby Nest
Jennifer Rizzo
Simple Home Life
Craftionary
The Trendy Treehouse
Tidy Mom
My Romantic Home
Chic on a Shoestring
Beyond the Picket Fence
Fireflies and Jellybeans

craftionary