Showing posts with label Sewing. Show all posts

Tuesday, October 23, 2012

Pinterest Challenge: Fall Edition!


We interrupt the pinning in progress (because you know you are) to bring you a special announcement: the Pinterest Challenge: Fall Edition is here! Once per season, a bunch of crazy people get together over the Internet to share the projects that they've pinned and punched in the face. By punched in the face, I mean they've completed the project for themselves (maybe with a few tweaks here and there based on their own taste).

Hosting this challenge are Sherry @ Young House Love and Katie @ Bower Power. Their co-hosts this time around are Sarah @ Ugly Duckling House and Carme @ Our Fifth House. These four are among the best bloggers out there. (I just haven't been discovered yet.)

I've joined the last two Pinterest challenges with my Blueberry Lemon Yogurt Loaf and my 1940s wood file cabinet redo. Having just realized that Fall is already upon us, I'm still not 100% sure what I'll complete. Here's what's currently pinspiring me:

An upcycled dresser drawer made into an ottoman by Becky @ Beyond the Picket Fence,
A DIY sunburst mirror by Andrea @ Decorating Cents,
or something gray and yellow for my next room redo
(styleboard created by Chelsea @ Tis So Sweet).
 
Please consider joining me for the Pinterest Challenge: Fall Edition. Along with many most of you, I am so very busy and don't have a heck of a lot of time to pinning and projecting; but here's what's awesome about the challenge: 1) It's meant to be fun. Don't stress yourself out by biting off more than you can chew. Do something simple and manageable if you don't have time for much more. 2) It can be used as a stress reliever! If you're bogged down with stuff at work or home, use the challenge as a chance to take time for yourself!
 
The rules are simple:
  • Give credit where credit is due. Link your project to the original source.
  • Shut up and commit! Take one week, and only one week, to complete the project of your choice. Projects should be completed by Tuesday October 30. You have the whole weekend!
  • Come back here on October 30 (and visit YHL or BP) to share your results.
  • Have fun! :) Projects can be anything you've pinned -- a recipe (MOM), a piece of art, a furniture repurpose, a sewing or knitting project you've been dying to try. The possibilities are endless!
Please join me! It's so much more fun to do things together! :)
P.S. If you enjoy reading my blog, please follow me by clicking "Join this site" and/or entering your email address over to the right of the page. If you want to see what projects I have worked on or plan on working on in the future, follow me on Pinterest by clicking the link to the right! If you like it, pin it!

Monday, October 22, 2012

Patio Furniture Upgrade

Remember those outdated gliding patio chairs that we were gifted way back in the Spring? I told you I was going to have them updated by the time I went back to school. Well, school has been back in session for almost two months now, and I just finished the upgrade last night.

This is what the chairs looked like pre-upgrade:

 
I decided to go with a trendy color combo for the update: grey and yellow. After measuring the original cushions, I bought 3 yards of a yellow and white geometric indoor/outdoor print from fabric.com.
 
 
When the fabric came in, it sat around for quite a while. A few weeks back, I finally got around to recovering the cushions. After carefully measuring a second time and cutting the fabric, I sewed two pieces together on three sides. Then, I slipped the original cushion inside the pocket. Finally, I used my  Dritz snap fastener and some size 16 (7/16") snaps to close the top. That way, I can easily remove the covers for cleaning.
 
After covering the cushions, the filthy chair frames sat outside for another few weeks. I finally decided to get my butt in gear this weekend. I pulled out the spray paint and got going. After thoroughly cleaning and drying the frames, I gave them each a coat of gray spray primer by Valspar. Then, I added a coat of gloss protective enamel in gray by Rust-Oleum.
 
When I got home from work this evening, I went straight to the garage to add the cushions to the frames to see what the final product would look like. I have to say, I'm pretty happy! Check them out...


What do you think? If you look closely at the first picture, you can see that the dark green strips from the original cushions show through a bit. It's pretty subtle, so it doesn't really bother me a whole lot. It certainly wasn't worth the extra work to sew in a lining! I just love that snap fastener. It should make it way easier to clean the covers since they'll get filthy dirty before I know it!
 
It's too bad that I didn't get my butt in gear early enough to enjoy the chairs during the Summer. We may squeeze out a couple more mild days before they get put away for the Winter, but we should get much more use out of them next year.
 
P.S. If you enjoy reading my blog, please follow me by clicking "Join this site" and/or entering your email address over to the right of the page. If you want to see what projects I have worked on or plan on working on in the future, follow me on Pinterest by clicking the link to the right! If you like it, pin it!


Saturday, September 29, 2012

DIY Unpaper Towels


In keeping with what seemed to have become a theme last (Last?! Is it Fall already?!) Summer, I went ahead with something I'd been seeing all over Pinterest: unpaper towels. I could link up with about a hundred bloggers who have created the reusable towels, but I have to say, my favorite tutorial has to be Lilly's at Cottontail Babies. I'll explain exactly why a bit later.

To get the party started, I ran to JoAnn's with coupon in hand and purchased 1 yard each of flannel and terrycloth. Most of the tutorials I checked out suggested a pretty, decorative flannel and a coordinating terrycloth. I just didn't see the point of choosing a cutsie fabric since the unpaper towels would be stored underneath my kitchen sink. It would make more sense to pick out something specific if they'd be displayed on the counter. I picked the least expensive terrycloth I could find (on sale for $2.50/yard) and a reasonable flannel for $7.99/yard. (I used a 60% off coupon for that.) I walked out of the store about $6.00 poorer.

When I got home, I cut the fabric into 11-inch squares. I got 9 squares of each out of the fabric I had.

 
Then, I pinned each of the pieces of terrycloth to a piece of flannel.
 
 
Then, I sewed along the edges with about a 1/4-inch seam allowance. I don't have a picture of this, but I ended up leaving the edges raw. (As opposed to sewing them inside-out and turning them inside-in for a cleaner, more finished, look.) I figured since these would be kitchen towels that would be stored under the sink, it didn't really matter what they looked like.
 
I also sewed a big X on the towel (from corner to opposite corner both ways) so that when they were washed, the sides wouldn't come apart.

Next, I used Dritz snap fastener and some size 16 (7/16") snaps to help create the effect of actual paper towels. Again, no picture for this step. (Sorry. Sometimes I get wrapped up in the process and forget to snap them. I need to be a better blogger.) If you have or purchase these pliers and snaps, the directions on the back of the package are easy to follow. Most importantly, when making these towels, you need to fasten an outtie (the part of the snap with the nub) on both corners of the right side of the square. Then, fasten an innie (the part of the snap with the hole) on both corners on the left side of the square. This ensures that when you use and wash the towels, you can snap them back together correctly.
 
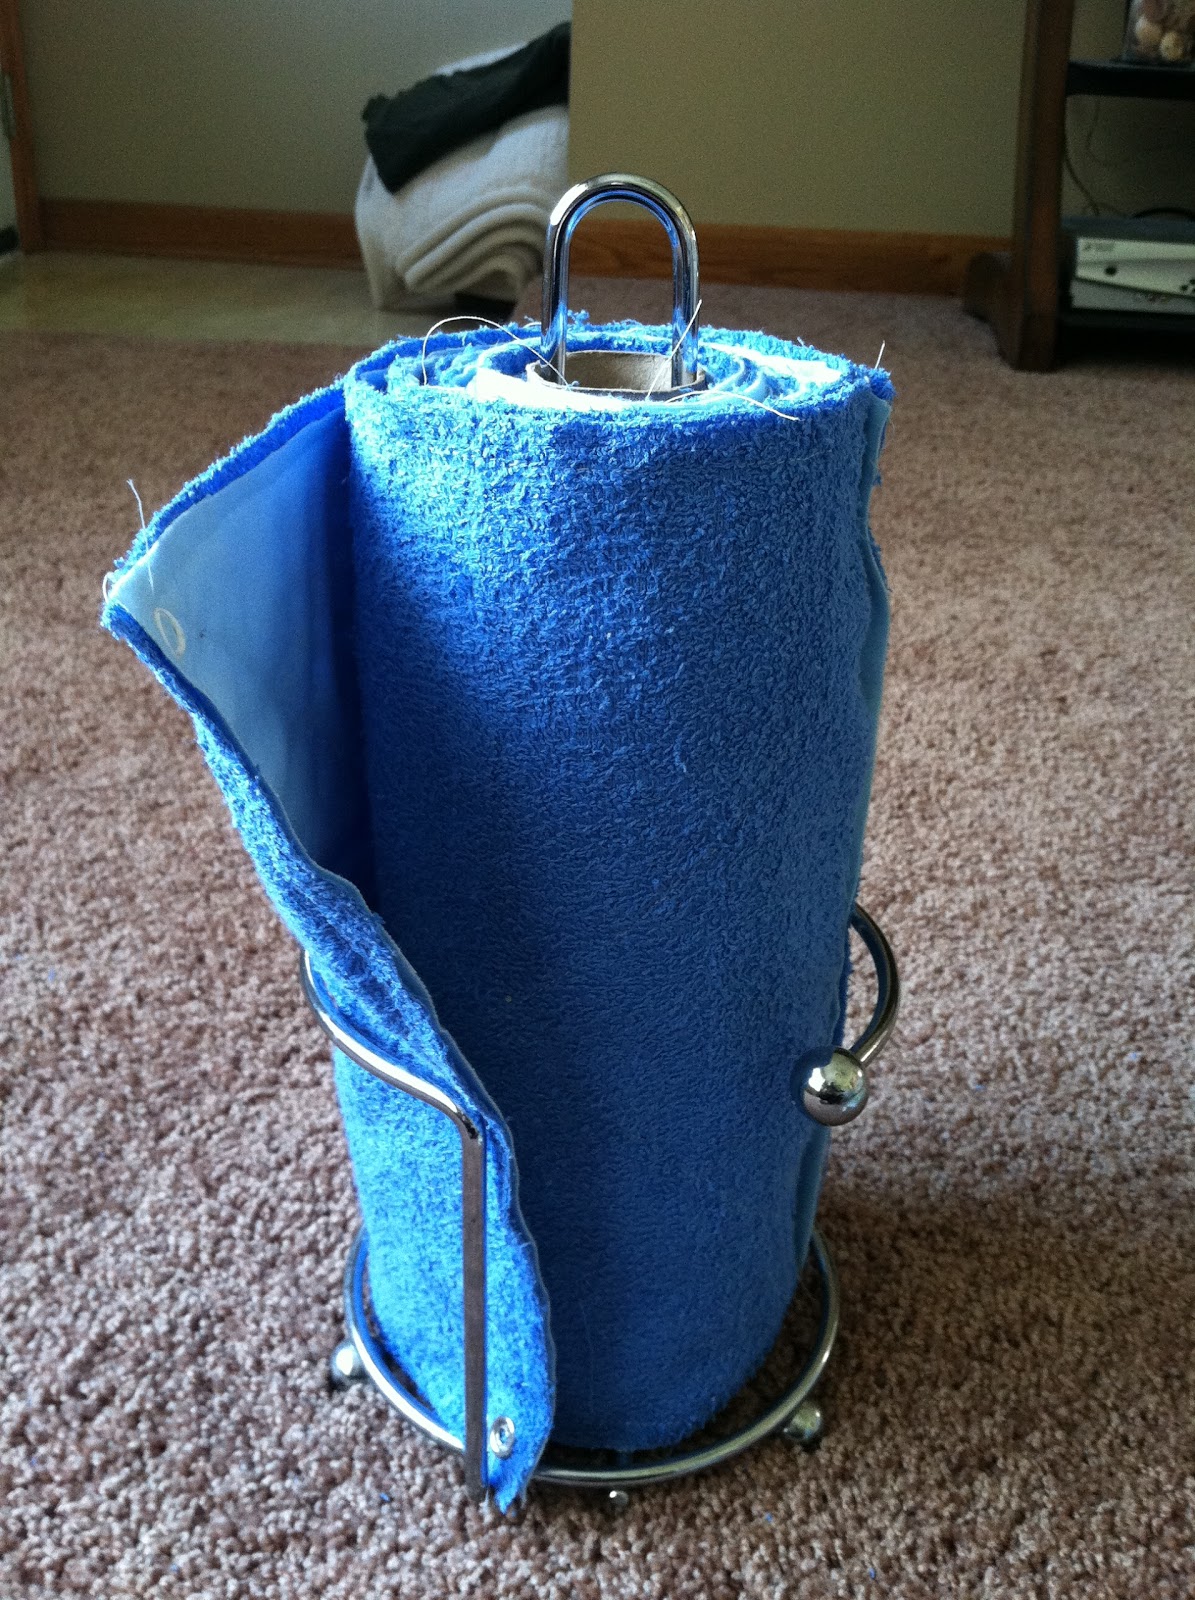
For my unpaper towels, I recycled a used paper towel roll. Some tutorials suggest making a roll out of plastic, but my way is free! I simply secured a snap using the same fastening method to the top and bottom of the cardboard roll. Check it out.
 
 
Sweet, huh? Finally, I rolled the pieces of fabric together for a $6 unpaper towel roll that can be used for years!
 
 
Back to why I really liked the Cottontail Babies tutorial. In short, she was honest. To wrap up her post, she admitted a few of the very things I was thinking on my way home from the store:
  • It's going to take some effort on my part to snap them back together after washing them. I hope I don't end up just folding them and stacking them under the sink.
  • I could have skipped the sewing part and simply fastened snaps to cheap washcloths instead. But they're durn cute.
  • This could have been yet another use for upcycled T-shirts. It would have been free. I only paid about $6 for the fabric, though, so if I use them like they should be used, they'll end up costing pennies over the next few years.
  •  
Even though all this is true, the project was fun and it's super cute. I think it could be a pretty cute (and inexpensive) housewarming gift! Let me know what you think!
 
P.S. If you enjoy reading my blog, please follow me by clicking "Join this site" and/or entering your email address over to the right of the page. If you want to see what projects I have worked on or plan on working on in the future, follow me on Pinterest by clicking the link to the right! If you like it, pin it!
 

DIY Show Off
I'm linked up with DIY Showoff


Thursday, August 16, 2012

Upcycled T-Shirt: DIY Reuseable Shopping Bags

If you're anything like me (and millions of other people around the world), you've probably accumulated an overabundance of T-shirts over the years. Said shirts are most likely taking up precious space in your dresser drawers. I'll take it a step further and guess that you have probably thought of getting rid of most or all of them but you either feel guilty or have some emotional attachment to them. Since I was a high school and a college athlete and a coach and a teacher in subsequent years, I have more T-shirts than I can count on my phalanges. Fleetingly, I thought about creating one of those super cool T-shirt quilts that are all-the-rage, but I think I have about as many blankets as I do T-shirts. Instead, I crafted reuseable shopping bags out of them!

About 10 months ago, (Yep, this 1-hour project has taken 10 months to complete.) I discovered that I couldn't squeeze even one more article of clothing in my dresser. So I sifted through my Ts and chose a bunch that I knew wouldn't wear anymore, some that didn't fit, and a few that I never wore in the first place. After that, they sat in a laundry basket in one of our spare rooms for...10 months. Fast forward to today. After blowing an inch or so of dust off the T on top, I grabbed the pile from the basket. I think I heard one of them exclaim, "I'm free!" Little did he know that life as he knew it was over. I don't know how to do the whole evil laugh thing, but if I did, I would have done it just now.

I started with a pile of 15 old T-shirts:


I randomly chose a guinea pig. Here he is:


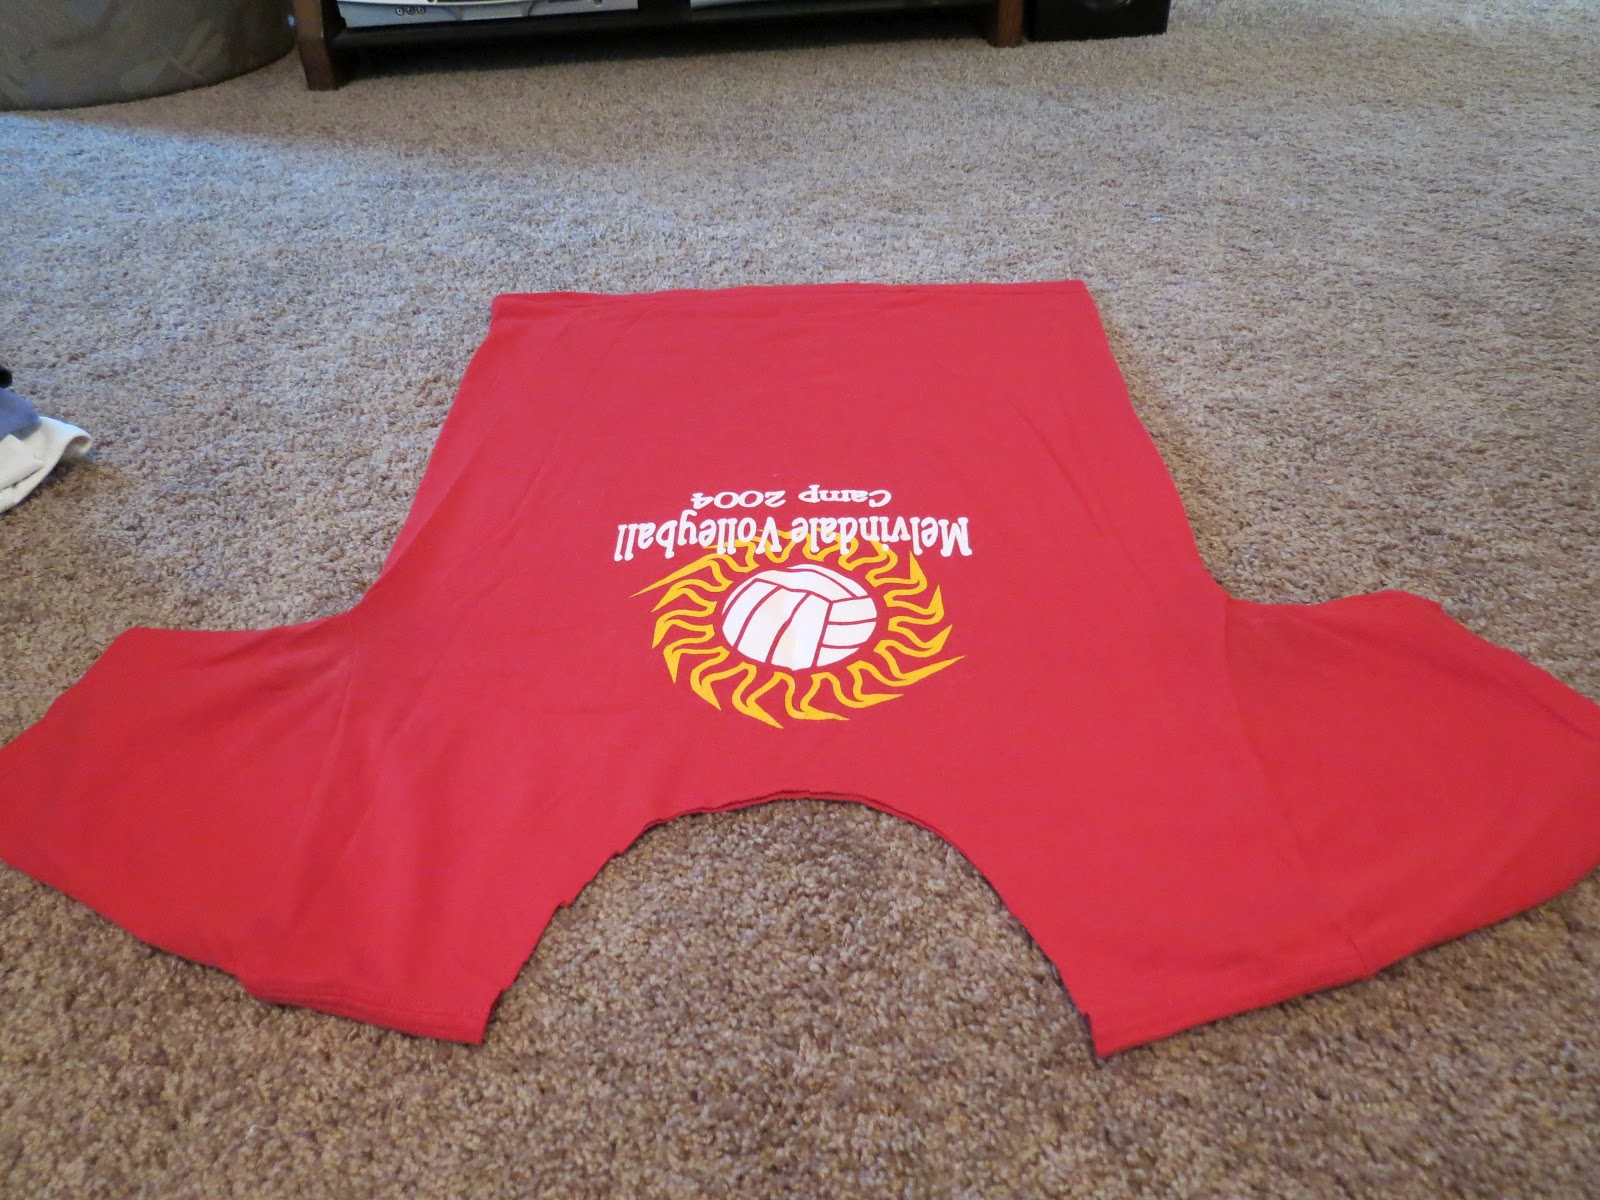
Making no measurements at all, I cut the neck off the shirt. I'd say I cut about an inch or an inch and a half off the collar, following the original shape.


Then, I cut the arms off of the shirt, paying careful attention to remove the entire pit stain. Ladies sweat too.


Next, I turned the shirt inside out. (FYI: I turned subsequent shirts inside out before doing anything else. That way, I didn't have to line anything up a second time.) Then, I pinned the back and front of the shirt together at the bottom hem line.


Finally, using the original stitching as a guide, I sewed along the bottom of the shirt. (FYI: For some larger, longer shirts, I trimmed a couple inches off the bottom before pinning and sewing. Too-deep bags are on my hit list. For those same shirts, I also sewed up each side of the shirt to make them a bit skinnier. Again, no measurements needed.)


Voila! I was left with a reuseable shopping bag, complete with half empty boxes of pasta and a bag of almonds from my kitchen cupboards.


I followed the same steps for 14 more Ts.


Let's play a game. Do you recognize any of these T-shirts? If you do, leave me a comment and tell me which one (or ones) you recognize, if you too still have the shirt, and a memory we share that somehow involves the T. 


In about an hour, I made 15 reuseable shopping bags that are functional, eco-friendly, and washable(!) that still allow me to enjoy the memories of yore. The best part? They were...wait for it...free!

Have you done anything creative with your old T-shirts? If not, you should try this. I can't say enough about how easy it was. The hard part will be remembering to bring them shopping with me!

P.S. If you enjoy reading my blog, please follow me by clicking "Join this site" and/or entering your email address over to the right of the page. If you want to see what projects I have worked on or plan on working on in the future, follow me on Pinterest by clicking the link to the right! If you like it, pin it!
about an hour link button
I'm linked up with Hi Sugarplum!