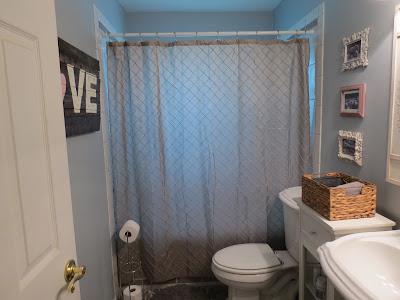
Here's what the bathroom looked like before:
And here's what it looks like now:
What do you think? I think I'm in love. Get it? Everyone likes a cheesy pun every once in a while.
For the most part, the project was as promised: simple and inexpensive. The most expensive detail was the paint at just less than $40 for a gallon. My aunt (owner of Campbell's Paint and Wallpaper in Dearborn, MI) did a custom color match for me. I picked up a paint sample at Lowe's out of convenience. The name of the original brand and color shall remain nameless; but the color match was done using a Benjamin Moore base and is somewhere between Silvery Moon and Winter Solstice by BM.
After a couple coats of primer and paint, I was unsure of how I felt. It was so...different. Having lived with pink walls for quite some time, it just didn't feel right. When I put the shower curtain back up, it really didn't feel right. Too. Much. Grey. Is that even possible? So I thought about it for 34 seconds or so then hopped online and ordered a natural (a soft white) waffle shower curtain. It came in the mail. I hated it. Luckilly, it came with a small stain. If I loved it, I probably would have embraced the stain (it was fairly inconspicuous), but since I didn't, I took the opportunity to get a refund and ship it back on the company's dime. Don't worry, they can afford it.
As I was racking my brain, I decided to go to the place where I do my best and most coherent thinking: TJ Maxx. As I perused the clearance section, I came across this simple little pink picture frame. I heard the voice of a teacher: "Embrace the pink. Embrace the pink." It wasn't my voice, but whose could it be? It was the voice of fellow teacher and fellow blogger, Carrie @ Shared and Doubled. She's so level-headed. So sensible. So right. Embrace the pink I did. That day, I came home with 3 frames: the pink one for $3.50 and two antiqued white ones for $6.99 and $7.99. I filled them with pictures we took on a recent trip the San Diego Zoo. Below are some closer photos of the frames.
Aren't they sweet? I just love them. Once those frames were hung, I fell in love with the color of the walls, and I fell in love (again) with the shower curtain I bought back when we moved into this house.
And then there was the issue of the now bare wall across from the sink. I put on my thinking cap again. Really, I put on the thinking caps of thousands of other bloggers around the globe. In other words, I searched the Internet. Finally, I found this fabulous DIY wall art first seen @ Shanty to Chic and pinned here. Below is my rendition of the artwork.
To complete this project, I went to Home Depot and purchased the following:
1 - 1x4 8 ft. furing strip ($1.99)
1 - 1x3 8 ft. furing strip ($1.55)
2 - 1x2 8 ft. furing strips ($1.84)
Gorilla Glue ($4.97)
Minwax Stain in Dark Walnut ($4.33)
At Home Depot, they will cut your wood for free. I had them cut these into 3.5 ft. sections. I had them cut the extra furing strip to fit the back (more on that later).
When I got home, I arranged the cut pieces how I liked them. Here's what I came up with:
Then, I glued the extra furing strip pieces to the back using the Gorilla Glue. After that, Rich drilled a 1 3/8 inch screw into each section of wood.
Finally came the fun part: staining! Because this was my first go at anything like this, I followed the suggestion of the original artist and used a dark walnut stain. As soon as I started applying the stain, I loved the color. I went with only one coat since I was going for an old, reclaimed feel.
Once the stain was dry, I printed out letters using Microsoft Word. I used size 300, Arial Black font. Instead of cutting the letters out and using them as a stencil, I used a method I read about on That's My Letter. You take a ball point pen and trace around the letters while pressing firmly. When you're finished, the wood is left with an indent that acts as a guide when painting.
I used craft paint for the letters. I purchased Martha Stewart's Vanilla and Pink Carnation ($.79 each before the 20% off coupon I used). After the paint dried, I used 150 grit sand paper to rough it up a bit.
It wasn't love at first sight for me, but I've come around. If I could go back, I would probably make the letters slightly smaller and the heart the same size as the letters. Oh, well. It'll do the trick for now. Who knows? I might start from scratch and have something completely different hanging up there in a day or two.
All in all, the bathroom upgrade was a success. I still have to reinstall the towel ring. I'm fighting it for now because while they're super functional, they're not really pretty. I'm sure I'll break down eventually, though. I don' think the folded-towel-in-the-basket look will work forever.
Here's the breakdown:
Paint: $39.84
Frames: $18.48
DIY Sign Materials: $16.38
Grand Total: $74.70
I don't think that's too bad for such a drastic change. What do you think?
P.S. Check out
Campbell's Paint and Wallpaper in Dearborn, MI for all your paint, wallpaper and
framing needs. They offer the best color advice and customer service in
Metro-Detroit. They have a full line of stains and tools including Benjamin
Moore and Pratt & Lambertt paints. They guarantee their paint and stain
color matching, offer in-home color consultations, and service custom picture
framing using expert design & workmanship (their every day prices beat
Michael's 50% off price). They also offer a large wallcovering library.
P.P.S. If you enjoy reading my blog, please follow me by clicking "Join this
site" and/or entering your email address over to the right of the page. If you
want to see what projects I have worked on or plan on working on in the future,
follow me on Pinterest by clicking the link to the right!
 |
| DIY Showoff |
 |
| Craftionary |


Looking good Katie, can't wait to see it in person.
ReplyDeleteThanks! :) I like it too, but alas, I am never 100% satisfied! Ha ha...
DeleteOh, gosh. I don't know what I'm enjoying more--your flattering words or the fact that my advice played a little part in such great results! Don't overthink your "Love" sign. It's adorable!
ReplyDeleteThanks! I'm enjoying it more and more every day, but I just can't get over my perfectionist ways. Seriously -- thank you so much for the advice. If I went way too far off the beaten path where colors are concerned, I could (and think I would) have ended up devastated.
DeleteWhat a great improvement for such a minimal cost! I really enjoy the Love sign, especially the tip of tracing the letters and using that as your guide for paint. Nice work!
ReplyDeleteThanks, Kathleen. I was thinking about you today while watching the Nate Berkus Show. Ha ha...Check out what I mean in your comments!
DeleteIsn't that tracing tip fantastic? It'll take some practice. I think using a better, or smaller, brush would have gone a long way in helping my cause, but I have a thing for cheap sponge brushes!
I love the update! And that sign is GREAT!
ReplyDeleteThanks! Thanks! I like it more and more each time I walk into the bathroom. Oddly enough, I like it best when looking at it through the mirror. Ha ha.
ReplyDeleteThe bathroom looks so pretty! What a beautiful transformation! And I love the pallet sign - I'll be sharing an almost exact tutorial for the garden sign I did back at the beginning of the summer. Great minds DIY alike! ;) Thanks so much for sharing!
ReplyDeleteThanks! As I've mentioned, I like the sign more and more each time I walk into the bathroom! If I could do it over, I'd probably make a couple different choices, but it does work in the room! You're right about great minds! :) Thanks again!
ReplyDeleteSuch a cute addition to the bathroom.. Love it! :)
ReplyDeleteThanks so much! :-)
Delete